Sunday 25 October 2015

Garage cleanup and some welding

Well I had the family out on Saturday so I had a good full day in the garage. Took the opportunity to do a garage cleanup and rearrange to give me some more space to work on the ute. 
The first project car (Lotus 7 replica) was moved forward and put under a blanket for a sleep until the ute is finished. I also moved around the spare engine (4AG silvertop) to the under-bench engine storage area. And cleaned up the bench so I have a nice place to work on the electricals (the next step). I also popped the TIG setup on the bench so it's easier to use.

The Lotus 7 replica. Under blankets for a little while

Cleaned up bench (you should have seen it before!)

Engines under the bench (one 20V 4AG and a 16V 4AG with a stuffed bottom end)


Next up I got out the welder to do a few bodywork fixes. Firstly I plugged the factory aerial hole on the guard with a 1.6mm steel disc, then I patched up a split in the bonnet/hood where the hinge was (I think it was a stress fracture because the hinge was sticking). 

Patched up aerial hole (after grind back and priming)

Poor picture, but it's of the repaired crack in the bonnet near the hinges
And finally I gave the rear tray a cleanup with the grinder (remove some sharp bits and flatten off the welds where the timber is going). 
I also revisited the rear panel where the lights are going. I had MIG'ed the bits together but I didn't like the finished, so I ground them back and went over again with the TIG. Much nicer. 

Rear panel on tray after TIG and final grind back before painting.
Lastly I gave the galvanised parts of the tray (the guards and the tie down bars) a go with some etch primer (AKA white vinegar) before I give it a final wash down with sugar soap and a paint with some satin black epoxy (tomorrow's job)

The ute and tray, now able to be side-by-side in the garage

Monday 19 October 2015

Finishing the frame structure

So after a week off after a week in Queensland, I've got back into the frame and have finished off the basic structure. 

The tie-down bar supports went in (just used some leftover 100x50 RHS), as did the cross bracing for the forward mounts and a few other bracing sections to help the timber. Next step is to remove the tray and fully weld the bits I couldn't get to, but I need some extra muscle to get the tray off - and it's gone 9:30pm by the time I got to that point. 

I also gave one of the guards a test paint with some leftover Rustoleum Satin Black that I had. It didn't look too bad, but I think I'll still go with an epoxy enamel for the frame. 


Thursday 8 October 2015

Tray (continued)

On the way home I dropped into Masters to pick up some bits I needed. Got a length of angle and some flat bar to finish off the tray (blanking RHS ends, making brackets etc). Nice that Masters carries ungalvanised steel sections (I've only seen gal at Bunnings). I also got a new cutoff wheel and I bought a litre of Rustoleum gloss red for the bodywork.

Next up on the tray was to make the rear panel (where the lights and number plate will go), the front return and more cross members

Next up will be the mounting brackets so I can finally bolt it to the chassis and fully weld it.


Wednesday 7 October 2015

Rear tray (cont.) and other bodywork repairs

More on the tray tonight.

Doing a bit of cutting and grinding (after 8pm too.... sorry neighbours) to make the back member and the sides (fore and aft of the guards).

Still to do is to add a few more crossmembers, make the brackets, the front return, the tie-down bars and the rear light mounts. Good fun

Side view showing the gal trailer guards that came with the car. They just needed the original mounting holes plugged up


I've also started to patch up some holes in the doors left there by the original owner (he had fitted some large truck-style mirrors). So I got out the MIG and patched the holes and ground back (roughly) so they can be sanded back and bogged if required.


Welded up some holes above the quarter windows (damned flash)


I also removed the back window just for the hell of it. I really wanted to see what the paint colour was under there. It appears it to be originally red. 


And I also picked up my new rear brake lines from http://www.thebrakeplace.com.au/ in Berwick. The rear brake lines on the car appeared to be newly done, but when I tried to bleed them they leaked out of the tube nut fittings. So I dropped off the original lines to these guys and they replace the lines (just cut to length and fitted with new tube nuts) for $36. Pretty good I say. They even supplied some 3/8" bleeder nipples because mine were a bit shot. 
Old (top) and new (bottom) lines. I just need to bend it myself


Saturday 3 October 2015

Playing with paints and starting the rear tray

Today I fitted the new side indicators (will be required for registration since the original builder removed the front corner indicators. 

Here's the car with the new indicators trial fitted (just forward of the a-pillar). Is it just me, or does the car look like a Lancia Fulvia here?


I also had a play around with some paints. I've read a few pages about guys in the US using Rustoleum to paint cars. 

This guy had painted with the flat black paint:
http://www.hotrod.com/how-to/paint-body/hrdp-1108-1967-chevy-camaro-affordably-flat-painting/

And this guy had painted a Corvair with a gloss white (with a roller of all things!)

So I got a couple of small pots of Rustoleum from the local hardware shop. Got some gloss red and some satin black. I tried both on the car - the black came out OK and I was very tempted to do the whole car in it. But then I tried the gloss red on the front guards and it's very nearly the same colour as the original paint. It came up very nice just applied with a brush, and judging by the Corvair (above) I think the finish will be very good when I spray it. 


Starting the rear tray

So I removed the existing rear tray (and it was f&*king heavy!) and set about building a new one. I'm reusing the gal trailer guards that came with the car, so I've welded up the existing bolt holes because the top will be on show. Below is some pics of the initial layout of the steel frame (I'm using 50x25x1.6 RHS). The frame will be simple 1.5m wide x 1.9m (or thereabouts) long with a 400-500mm return on the front, and I'll be lining with decking or flooring boards. The load capacity will be reduced slightly I guess.


Lowering the Datsun

I've been researching how to lower the truck. I was originally planning on resetting the rear leaf springs, but then decided on getting some lowering blocks instead. I got a quote at Supercheap (!) for the aftermarket Nolathane kit for this car (part number 47960) and they wanted $200. I figure that's pretty steep for some u-bolts and a block of aluminium. I went chasing some u-bolts to do it myself but they turned out to be $75 for 4 of them. 

Luckily I found these guys at Online Performance in Hallam who had the kit for about 1/2 the price. And here it is

Here's the back of the ute at the standard ride height. 

And here's the standard u-bolts holding the axle to the leaf springs


Removing the existing setup was easy enough. Here's the lowering blocks in place. I ended up shortening the supplied u-bolts by about 40mm. 


And I had to shorten the existing rubber bump stops (did with a hacksaw)

Lowering the front

The front suspension is torsion bars which can be adjusted down to lower the ride height. Here's a pic of the adjustment bolts. With the existing bolts, you can get about 50-60mm drop at the front. Basically you turn these square nuts anti-clockwise to loosen the bolts to drop the height. 


So I ended up with around a 2.5" drop all around, which has really helped the stance.


New fusebox & fitting clutch master

Here's the new fusebox for the Datsun

I mounted the fuseblock, relays and distribution block on an aluminium panel that I had lying around. 

So I have 8 fuses now - 4 are direct from battery and 4 from the ignition relay. I put an 8-way connector from the fusebox, and will have about 6 incoming from the cabin - indicators, horn, ignition and lights. I'm still waiting on my new 8-pin flasher module (ebay linky) that will hopefully cope with the LED indicators and provide an easy way to implement a hazard switch


I also received my replacement clutch master cylinder from an ebay seller in Thailand. It was a prick to mount because the existing captive bolts were knackered and I didn't have any M8 or M10 captive nuts. But apart from that it was a fairly easy fix


Catchup..... loom and headlights

Well it's been a while since the last update..... Lots of stuff happened.

I checked out the tie rods for the steering and found that the boots are basically shot, so I had to get a set of new ones. Based on the sizes, the RoadSafe RB195K boots should fit, so I got 3 pairs of them. This car had 2 different styles of boot (one with retaining wire and one without) but the tie rod sizes are the same so I just got 3 pairs of the same boot from the local Bursons

I've also listed the stock wheels on Gumtree here. Hoping to get $150 for them otherwise I'll probably strip off the tyres and keep them with the car in case I want to go back to the stockies. The caps would probably need a rechrome, but they'd be good as-is on a ratrod. Turns out the bolt pattern is standard to a lot of light commercials into the 70's and 80's. 


I also received some various bits and pieces off of ebay. Below is a Datsun 70's style AM radio from a guy in Brisbane. Paid $25 for it, and it's in pretty good nick. Intention is to gut it and put something modern in there but retain the period look.

I also received a matched set of ignition locks and door locks from a Datsun Sunny. I'll use the door locks but the intention was to use the ignition switch in place of the dash-mounted ignition switch. Turns out it will be too much mucking about so I ended up buying a Narva dash-mount ignition switch. The car will have 2 different keys but who cares?


Also doing more work on the loom. Here is it with the new 8-way fusebox and relays. The relays were from the old project car (just because they were there) but have never been used. I'm going to have 4 relays - horn, ignition, low & high beam lights. Probably have too many fuses but I'd prefer to err on the conservative side. I was just going to clean up the old loom but I've ended up more-or-less rebuilding it. 


Stripping out the headlights & indicators.

Based on how unimpressed I was with the loom as I saw it, I decided to strip out the rest of the wiring to inspect it. The car has twin headlights, but only one pair were any good. The outer pair were Hella H4 with high/low beam and a park light (which the guy had wired in parallel with the indicators FFS). The inner pair, well I don't know what to say. They're a frankenstein of various bits. Looks like he's tried to make a H4 substitute by gluing different bits together. Well they're going in the bin, to be replaced by another pair of H4's (again borrowed from my other project car). 


Glued together headlight. Whatever next

I also took a couple of pics of the existing tray that I'm hoping to get rid of. 

I also took off the panels to get an idea on what they were like.

And here's the car with all panels removed from the front.

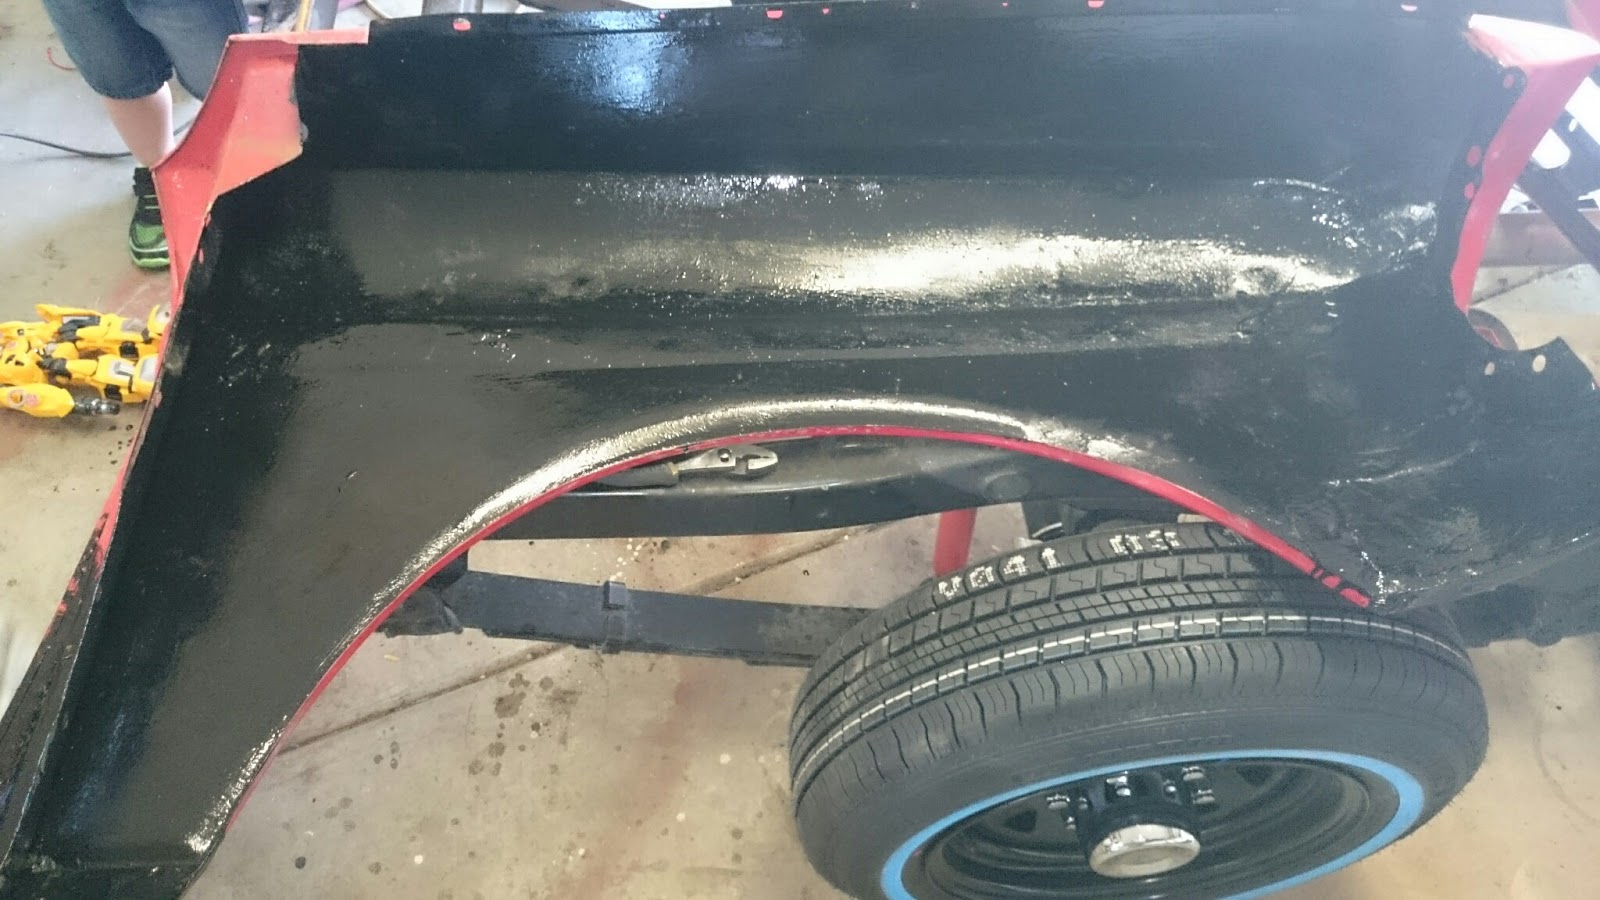
The quarter panels / front guards had been modified to blank off the existing corner indicators. He's fibreglassed up the holes and had done a pretty good job.  But there was some rust in the bottom of the panels which had been 'glassed up. I removed it and gave the area a good blast with rust converter after getting rid of the loose rust. There was moisture behind the 'glass so it was going to rust more if I didn't remove it. After rust coverting it I'm leaving it as is. It's sound enough and there's enough metal there for it not to be flimsy. 


Bottom inside of the guard after removing the fibreglass 'fix'

The rest of the panels were largely OK. I gave them a cleanup with a wire brush on the drill, a douse with rust converter and a paint with some satin black rustoleum